Hello 2021

Hi everyone, it's been a while since I last updated this blog. I hope all of you are doing well and are safe during this pandemic.  

News with me:
I published two apps to the App Store:

Yumaholic - my cookbook on the iPhone and iPad

HmongPhrases - simple conversation hmong phrases that you can learn today!

Tapioca Honeycomb Cake

Ingredients:

  • 10 eggs
  • 1 1/2 cup sugar
  • 1/2 cup warm water
  • 1 can coconut milk
  • 1 tsp vanilla extract
  • green food coloring
  • 1 bag tapioca flour
  • 3 tsp cream of tartar
  • 1 1/2 tsp baking soda

Pre-heat oven to 350 degrees. Spray a hot pan and place into oven to heat up. 

In a large bowl, crack the eggs and mix. 

In another bowl, add the water and sugar. Mix.

Combine the eggs with the water and sugar mixture. Mix.

Asian inspired citrus turkey

Turkey recipe

  • 21 pound turkey, defrosted
  • 1 gallon apple cider
  • 1 gallon water
  • 1/2 cup salt
  • 2 tbsp chicken powder
  • 1/4 cup melted palm sugar with 1 tbsp water
  • 1/4 cup brown sugar
  • 4 lemon grass split and half
  • 1 or 2 oranges sliced
  • 4 stick of butter
  • 2 tbsp garlic powder
  • 2 tbsp black pepper
  • 2 tbsp apple cider vinegar
  • 1/2 cup honey


To make the brine:

  • Add the apple cider, water, salt, chicken powder, palm sugar, brown sugar, lemon grass and orange slices to a large bucket. 
  • Dunk the turkey until submerged.
  • Add ice. 
  • Cover with lid and let brine overnight 12-24 hours.


To prepare turkey:

  • Pat dry.
  • Use a spoon and gently lift the skin off the meat. You can also use your hands.
  • Spread butter under the skin.
  • Stuff the turkey with the veggies.
  • Tie the turkey ends, fold the wings under.
  • Add veggies and water to the roasting pan.
  • Place turkey in roasting pan.
     

Baking:

  • Preheat oven to 350 degrees.
  • Bake turkey covered with aluminum foil for one hour, then remove foil.
  • Bake turkey until the breast temperature is 165 degrees. 
  • Baste turkey with pan drippings.
  • Last 15 minutes, brush with honey.


Nab vam tapioca strings

This is a super easy recipe to make Hmong Nab Vam strings (pronounced as na va), also known as tapioca worms.  My fellow sister in Christ, Nam Phoumee, taught me how to make this recipe! Thank you Nam Phoumee!!!!!

Nab Vam Ingredients:

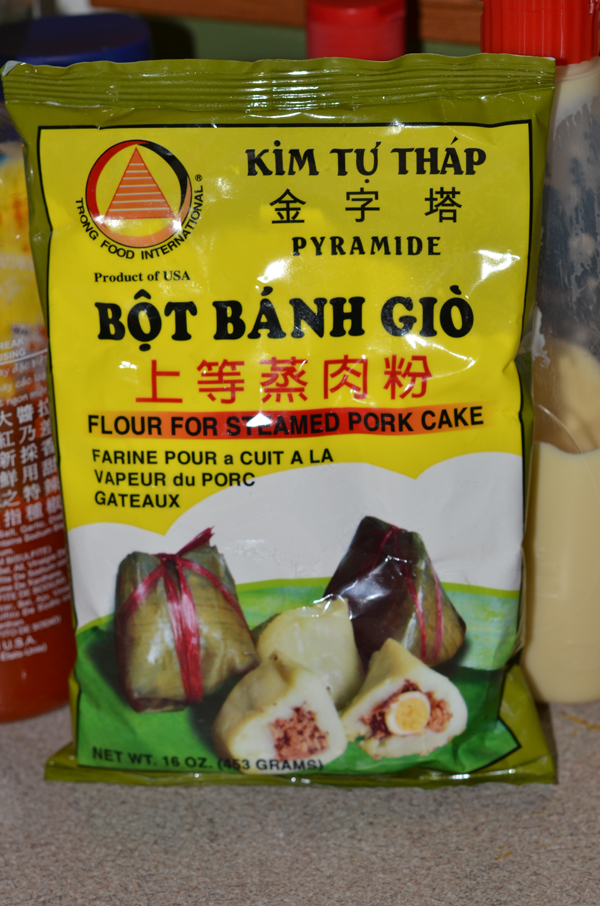
  • 1 - 16oz bag of Bot Banh Gio flour (see picture below)
  • 9 cups of cold water
  • food coloring of your choice

Other stuff to get ready

  • a really big pot to cook the mixture
  • a steamer pot with a top pot that has holes and a bottom pot for water (I got mine from a korean store)
  • a big strong spoon (flat or round, preferably a wide spoon)

Let's start!

  1. Mix the flour and the 9 cups of cold water in a pot.  Stir until disolved.  It will resemble white milk.
     
  2. Add the food coloring of your choice.  I prefer to use the powder food color cos it makes the color brighter.
     
  3. Place the pot on the stove and cook on high heat and stir.
     
  4. Watch the pot closely and stir continously.  Within 3-5 minutes the mixture will start to thicken.  Then in the last few stages it will get really thick within a few seconds!!!! This is why it is important to use a big strong spoon. Keep stirring!
     
  5. When the mixture starts to develop big bubbles and get shiny, turn off the stove.
     
  6. Stack the steamer pot in the sink.
     
  7. Pour the hot mixture into the steamer.  Using the big spoon with a downward pressing stroking motion, press the mixture down through the holes.  The tiny strings will fall into the bottom steamer. The technique to this is to press downward and stroke it to the side.
     
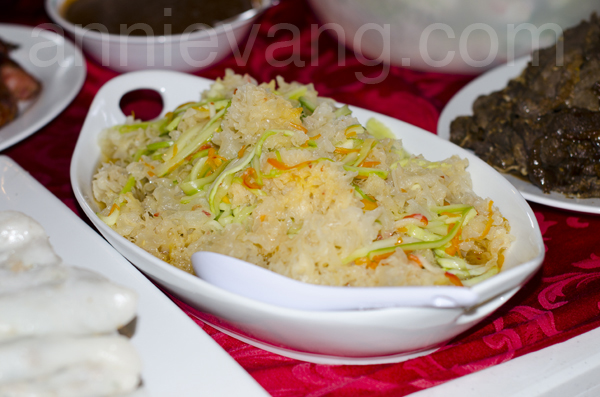
  8. Scoop out the strings and put them in the container of your choice. (see picture above)

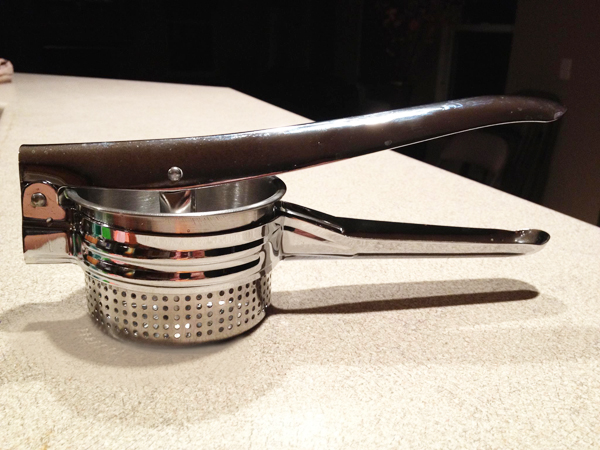
Update!!! -- I recently bought a potato ricer to try to make my worms and they turned out beautifully! You should try it out. You can buy it at Bed, Bath, and Beyond.


If you have any questions, please leave me a comment! The key to this is continuous stirring!

Barbecue pork ribs

Delicious, soft, fall off the bone barbeque pork ribs!

Ingredients

  • 1 slab of baby back ribs
  • 1 liter of apple cider
  • 1 white onion chopped
  • 4 cups crushed ice
  • 1/2 cup any brand of barbeque seasoning or barbeque rub
  • 1/2 cup any barbeque sauce
  • 1 tsp salt
  • 1 tsp black pepper
     
  1. Season the ribs with salt, black pepper, barbeque seasoning. Marinate it for a couple hours or overnight.
  2. Fire up the grill and grill the ribs for 10 minutes on each side until it's brown.
  3. In a large aluminum pan, place the crushed ice, chopped onion, and apple cider. Place the ribs on top and seal the top with aluminum foil.
  4. Place the alumimum pan on the grill for 1 hour and a half (or two hours). Cover the grill. Continue to check the pan often so that the pan still has juice. Do not let the pan go dry. If it starts to go dry, add more apple cider or water.
  5. Place the rib back on the grill and add barbeque sauce. Turn it on the grill so that both sides are nicely charred. Serve!


If you don't have a grill, you can also follow these steps and broil them in your oven.

White fungus mushroom salad

white fungus salad

This dish has a sweet, sour, tangy taste. It's very refreshing! You can adapt it with any ingredients you like! This recipe makes a big batch that feeds about 10-15 people like the picture above.

Ingredients

  • 1-2 bags dried white fungus mushroom (use more or less depending on your liking)
  • 1/2 cup sliced bell peppers (you can combine red, yellow, green bell peppers)
  • 1/4 cup sliced yellow onion or green onion
  • 1/4 cup chopped cilantro
  • 1 cup sliced strips of cucumber
  • 1 cup chopped lettuce
  • 1 cup cooked shrimp (sliced in half)

Sauce Ingredients

  • 1/2 cup sugar
  • 1 cup fish sauce (I use the Three Crabs brand, if yours is different you may need to adjust the amount)
  • 1 cup lime juice
  • 1 cup water
  • 1 tbsp garlic chili sauce (the chili in a jar with green cap), you can also just use thai chilies if you don't have this
     
  1. Soak the white fungus mushroom in hot water. It's best if soaked overnight but if you are in a hurry, you can soak it for at least an hour.
  2. Rinse the mushrooms clean and break it apart with your fingers into bit size pieces.  You can get rid of any dark yellow spots.
  3. Make the sauce by adding the sugar, fish sauce, lime juice, water, and garlic chili sauce in a large bowl.
  4. In a large bowl, add all the fresh vegetables and shrimp together and toss with the sauce.
  5. This can be eaten immediately but best served if refrigerated cold.
  6. Enjoy!

Tip! -- If using bell pepper, you can remove the skin first if you don't like the rubbery skin texture. I usually remove the skin and then slice them thinly.

Please note, this dish can be made ahead of time.  The only ingredient you may hold off on adding is the lettuce because it is delicate and will get soggy sooner.  You can adapt and add/remove any of the ingredients.  Experiment and do come back to tell me how it worked out for you!

Optional ingredients ideas:

  • avocado
  • vermicelli khaub poob noodles
  • jicama
  • cooked green beans
  • shredded papaya
  • other!

Deep fried tilapia fish

Here is my recipe how to make deep fried tilapia! You can adapt this recipe with any fish.

Ingredients

  • 1 pound cleaned tilapia fish
  • 1/2 cup green onion chopped
  • 1/2 cup ladysthumb chopped
  • 1/2 cup cilantro chopped
  • 1/2 cup culantro chopped
  • 1/4 cup mint chopped
  • 1 cup cherry tomatoes cut in half
  • 1 lemongrass sliced thin
  • 1 tsp garlic minced
  • 1 thumb ginger sliced thinly
  • 1 tsp oyster sauce
  • 4 tbsp oil for the sauce
  • 1 tsp salt
  • 3 eggs
  • 1 cup all purpose flour
  • 4 cups oil for frying
     
  1. Clean the tilapia fish and cut off the fins with a scissor or knife.
  2. Score the fish on both sides.
  3. In a small bowl, beat eggs and coat the tilapia in it.
  4. Coat the tilapia with flour on all sides.
  5. heat a pan over high heat.  Ad enough oil to deep fry the fish until golden brown. Flip on each side until golden brown and to ensure the fish cooks evenly.  When the fish is crispy on both sides, remove it from the oil and place onto a plate.
  6. In a smaller pot, make the sauce by adding 4 tbsp of oil, ginger, garlic, lemongrass, oyster sauce, salt, tomato, green onion, ladysthumb, cilantro, and culantro. You can use MSG if you like. Cook for a few minutes until the herbs are wilted and the tomatoes are soft.
  7. Pour the sauce over the fish and serve hot.


banh bo steam rice cakes

steamed rice cake, banh bo


This is a delicious Vietnamese dessert called steamed rice cakes also known as banh bo.  When I was little, my grandma used to make this for me (minus the coconut milk). There is a chinese version to this cake that doesn't use coconut milk. In hmong we call this "ncuav sawv".

Many years ago when I tried to learn how to make this dessert, I failed miserably 13 times.  On my 14th attempt, I finally got the beautiful honeycombs in my steamed rice cake. Oh boy, what a journey that was!  The key to this recipe is PATIENCE!!!! Do not rush anything otherwise, you'll end up with a flat and unflattering cake.  I also found that the secret to nice honeycombs is also in the preparation of the first step. It is critical that you have a good solid container.

Update!
If you use instant yeast, you only need to allow the batter to rise for about 1 hour, then add the coconut/water/sugar mixture and let rest 20 minutes and then you can steam it. No need to wait 5-10 hours.

Ingredients:

  • 1 - 16 oz bag rice flour
  • 2 cups lukewarm water
  • 1 tbsp sugar
  • 1 package yeast or 2 1/4 tsp yeast
  • 1 - 13 oz can coconut milk (the cooking kind is preferred, do not use dessert coconut milk)
  • 1 3/4 cup sugar (adjust sugar to your liking)
  • 1 cup water
  • gallon ice cream bucket or other airtight container

Step 1

  1. Add 2 cups warm water, yeast, and 1 tbsp sugar to an ice cream bucket. Mix.
  2. Add rice flour and mix.
  3. Close lid, set aside for 5 - 10 hours (or overnight).  The batter will rise and fall.  The longer you keep it in the container, the stronger the flavor. 

Step 2

  1. In a small pot, add 1 cup water, coconut milk, and the sugar. Heat on medium until sugar is dissolved. Do not boil.
  2. Set aside for 10-15 minutes until cool.

Mixing it all together

  1. Using a whisk, stir the batter to loosen it from the ice cream bucket.
  2. Add the syrup from step 2 to the batter. Mix.  It will become the consistency like milk.
  3. Close lid.
  4. Set aside for 1 hour.

After 1 hour

  1. Open lid and you will see tiny air bubbles form.
  2. If you want to make multiple colors, separate the mixture into equal parts. Add food coloring of your choice. Skip this step if you don't want color.
  3. Heat a steamer to boiling and place a metal pie pan.  Make sure the metal pie pan is hot before you pour in the mixture.
  4. Steam on high for about 15-20 minutes.
  5. When the rice cake is done, the top surface should be solid.
  6. Remove from steamer and place into a freezer for about 10-15 minutes until cool.
  7. Transfer onto plate and cut. Serve

I hope you try this recipe and let me know how it turns out for you!

Variations!

  • Steam in tart molds
  • Cut up the bottom of soda cans and use as a mold.  It has a unique shape!
  • Steam in small round molds or dishes